Appearance
Deploying to Azure
In addition to on-premises deployment, a preconfigured Turbo Server instance can be deployed via the Turbo Server Azure Marketplace Image (AMI). The Turbo Server AMI has multiple plans which are preconfigured with the following components:
- Hub and Portal
- App
Users will need the following to deploy the Turbo Server AMI:
- Azure subscription
- Purchased or trial Turbo Server license
The following network ports are open by default once the Turbo Server AMI is deployed. These can be adjusted as necessary via the Azure Portal when the deployment is complete.
- 3389: RDP
- 80: HTTP
- 443: HTTPS
Note: While there are no extra charges to deploy the Turbo Server AMI, the Azure subscription will still be charged for any usage.
Hub and Portal Role Deployment
To deploy a Turbo Server AMI that includes the hub and portal roles go to portal.azure.com, click Create a resource, search for "Turbo Server", select the "Hub and Portal" plan, and click Create.
The deployment process is organized into several tabs that must be completed:
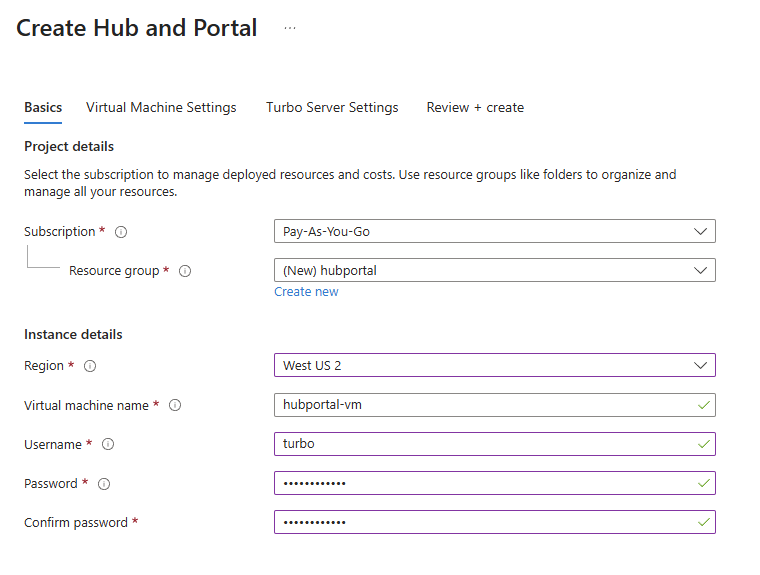
Basics Tab
- Subscription: Select the subscription to manage deployed resources and costs
- Resource group: New resource group to deploy the AMI
- Region: Azure region to deploy the AMI
- Virtual machine name: Hostname of the VM
- Username: Local administrative account username on the VM
- Password: Local administrative account password on the VM
- Confirm password: Confirm the local administrative account password
Virtual Machine Settings Tab
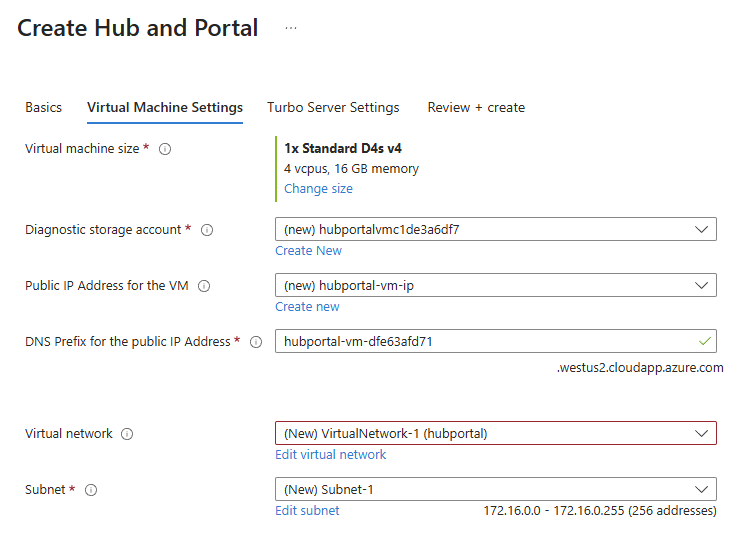
- Virtual machine size: The default VM size can be changed by clicking Change size to select a different virtual machine size
Turbo Server Settings Tab
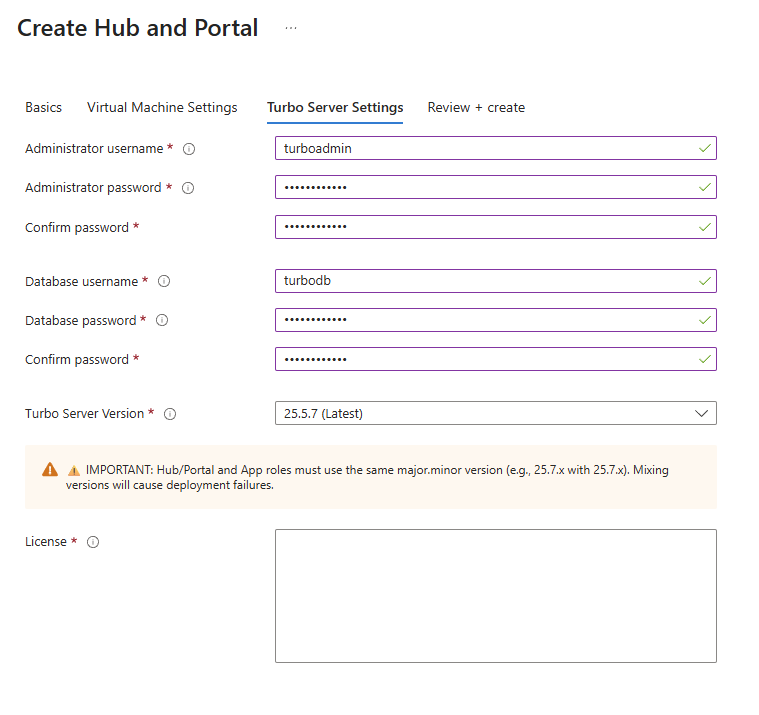
- Administrator username: Administrative account username for the Turbo Server instance
- Administrator password: Administrative account password for the Turbo Server instance
- Confirm password: Confirm the administrator password
- Database username: SQL account username that will be used to create and access the Azure SQL databases
- Database password: SQL account password that will be used to create and access the Azure SQL databases
- Confirm password: Confirm the database password
- Turbo Server Version: Select the desired Turbo Server version from the dropdown
- License: Valid (non-expired) Turbo Server license content pasted into the text area
Click Review + create when all the required information is added across all tabs and the review step passes validation. After reviewing the configuration, click Create to begin the deployment.
When the deployment is complete, you can access the Turbo Server administrative interface using the DNS name from the Overview page of the deployed VM in the Azure Portal. See Server Administration for details on accessing and configuring your Turbo Server instance.
For security reasons, it is strongly recommended to switch the portal to HTTPS. Please check the Managing a Server section to setup HTTPS.
App Role Deployment
To deploy a Turbo Server App AMI go to portal.azure.com, click Create a resource, search for "Turbo Server", select the "App" plan, and click Create.
Note: An existing Turbo Server AMI with the Hub and Portal roles is required to deploy the App role AMI.
The deployment process is organized into several tabs that must be completed:
Basics Tab
- Subscription: Select the subscription to manage deployed resources and costs
- Resource group: New resource group to deploy the AMI (must be different from Hub and Portal resource group)
- Region: Azure region to deploy the AMI (must be the same region as the existing Hub and Portal VM)
- Virtual machine name: Hostname of the VM
- Username: Local administrative account username on the VM
- Password: Local administrative account password on the VM
- Confirm password: Confirm the local administrative account password
Virtual Machine Settings Tab
- Virtual machine size: The default VM size can be changed by clicking Change size to select a different virtual machine size
- Virtual network/subnet: Must use the same virtual network and subnet as the Hub and Portal AMI. This can be found on the Overview page of the deployed Hub and Portal AMI VM in the Azure Portal.
Turbo Server Settings Tab
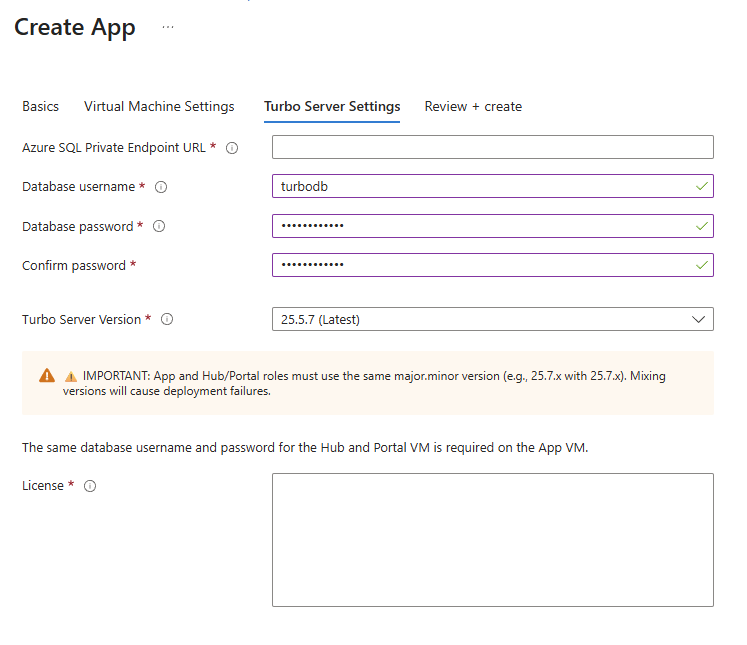
- Azure SQL Private Endpoint URL: Private endpoint URL for the Azure SQL instance created for the Hub and Portal AMI. To find this URL go to the resource group of the Hub and Portal AMI, open the Private endpoint resource and click DNS configuration. The required URL is the FQDN listed under config1. It will look similar to random-string.privatelink.database.windows.net
- Database username: SQL account username (must be the same database username used for the Hub and Portal VM)
- Database password: SQL account password (must be the same database password used for the Hub and Portal VM)
- Confirm password: Confirm the database password
- Turbo Server Version: Select the desired Turbo Server version from the dropdown
- License: Valid (non-expired) Turbo Server license content pasted into the text area
Important: Hub/Portal and App roles must use the same major.minor version (e.g., 25.7.x with 25.7.x). Mixing versions will cause deployment failures.
Note: The same database username and password for the Hub and Portal VM is required on the App VM.
Click Review + create when all the required information is added across all tabs and the review step passes validation. After reviewing the configuration, click Create to begin the deployment.
When the deployment is complete, the app instance will appear in the server management interface. See Managing Servers for details on viewing and managing your server instances.
Additional configuration steps to setup Turbo Server:
- Add applications to the Hub
- Configure Users, Directory Services, and Groups
- Configure Workspaces